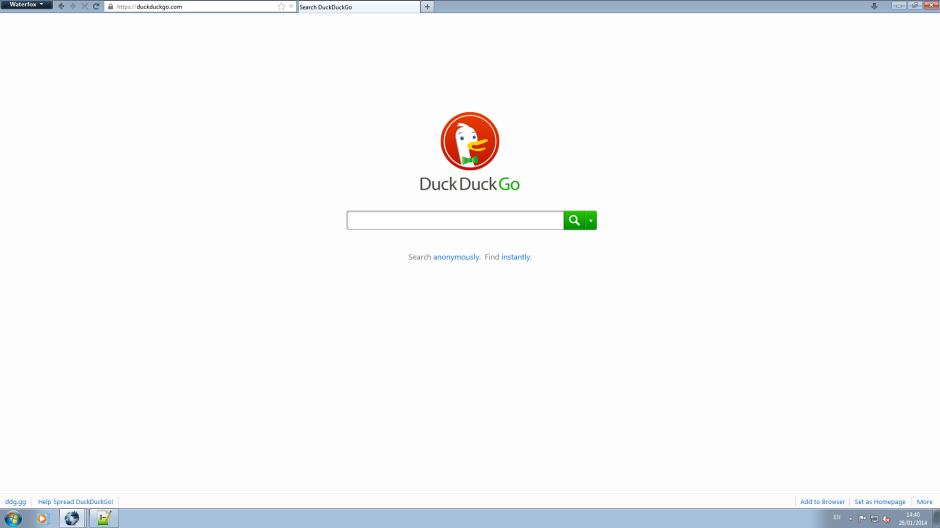
OK, so you like Firefox but maybe you don’t like something about the user interface?
For example I am always bothered by the fact that the search bar is redundant these days since you can search from the navigation bar and change the search engine which is used there via about:config. Having removed the search panel however, I am left with a navigation bar which is now the full width of the screen (1920 pixels!). Again this seems completely redundant.
I am generally a ‘pruner’: meaning I keep the number of open tabs to a minimum, compulsively closing those that I am not using. I heard this terminology from a Visual Studio dev, the other main category that people fall into being a ‘flusher’ who keeps opening more windows and tabs until it becomes unworkable and they have to close everything and start again. So I generally don’t need all the space on my tab bar either; wouldn’t it be nice if I could have everything on one line, freeing up some much needed vertical real estate for actual web content?
Well, thanks to the customisability of the Firefox UI, I can do this easily with a bit of CSS in UserChrome.css!
The UserChrome file is used to control elements of the Firefox UI using CSS code. While it doesn’t exist by default, you can create it yourself with your text editor of choice in your firefox Profile folder:
On Windows, it lives in your Application Data folder with a path like: C:\Documents and Settings\XXXXXXX\Application Data\Mozilla\Firefox\Profiles\chrome\userchrome.css
Under Linux it lives in a similar location in your home folder ~/.mozilla/firefox/XXXXX.default/chrome/userchrome.css
But fortunately there is an easier way to take care of this without needing to go mucking about in your filesystem, and it has the added bonus of not needing to restart your browser every time to see the effects of the changes you make. For this you need to install the Stylish Firefox Add On:
https://addons.mozilla.org/en-US/firefox/addon/stylish/
This is a great little add on that lets you make custom CSS for whatever sites you like and has a big library of styles made by others which you can install easily with absolutely no need for CSS knowledge required. It also allows you to modify the UI.
Having installed Stylish, create a new blank style under the ‘Manage Styles’ section and then add the following:
/*tells firefox this applies to UI*/
@-moz-document url-prefix('chrome://')
{
    /*removes tab icons*/
    .tab-icon-image
    {
        display: none !important;
    }

    /*shortens navigation bar*/
    #navbar-container
    {
        max-width: 300px !important;
    }
}
You should be able to hit preview and see the effects of this immediately. It’ll look a bit messy at first, but all there is left to do is move around some stuff using the toolbar customisation tool (right click any toolbar, move your url bar and accompanying buttons to the top left of the tab bar and then set firefox to not display the navbar.
Here’s mine that I’ve just done with a portable Waterfox (a 64 bit variant of Firefox for windows; highly recommended):
As you might imagine, there is almost no limitation to what you can do with this, you can change all colours, sizes and shapes just like you can with html elements using css, you just have to learn all their names.
Happy Hacking.
